KEYSWEEPER // SIGINT // SAMY.PL // REL TO ALL // APPLIED HACKING
KeySweeper
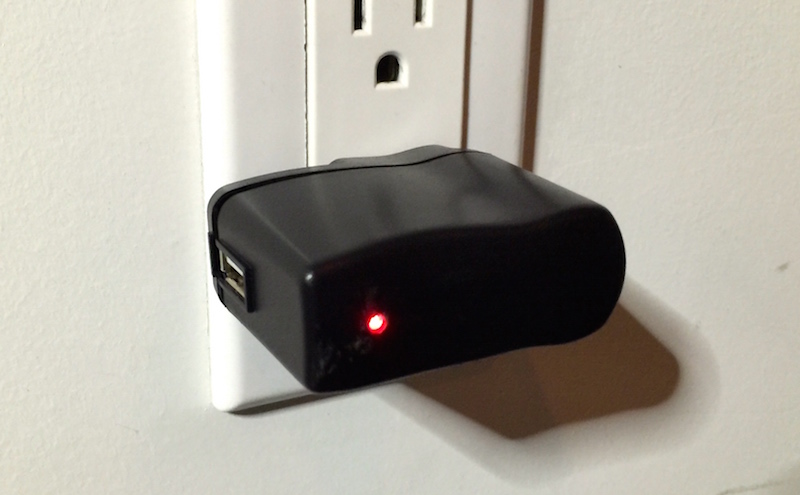
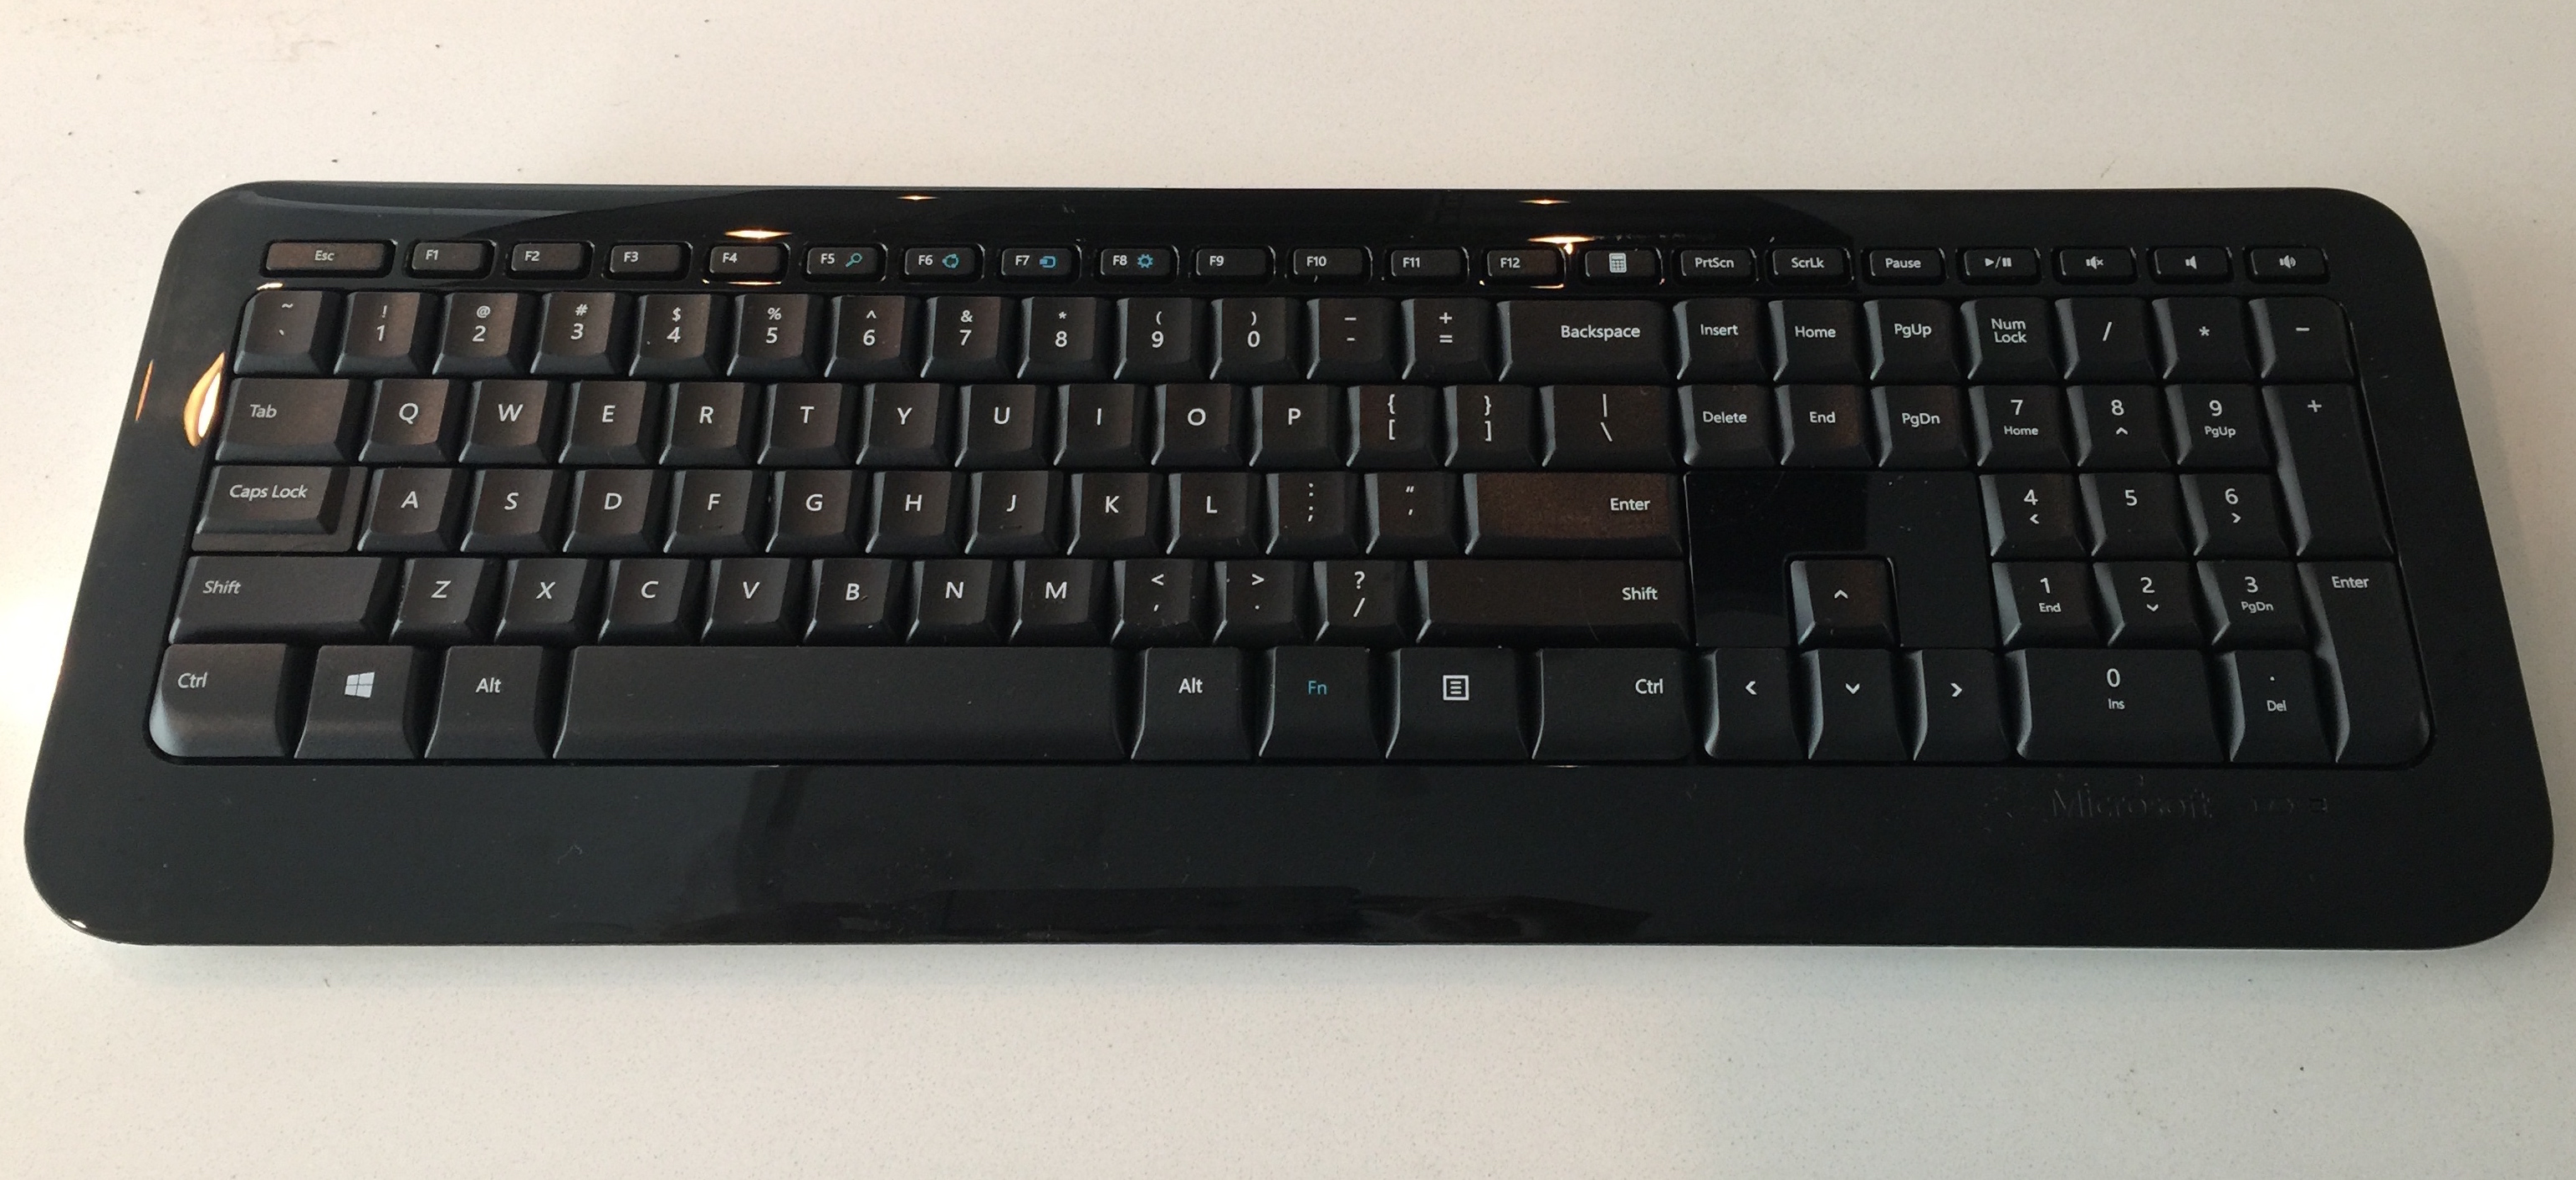
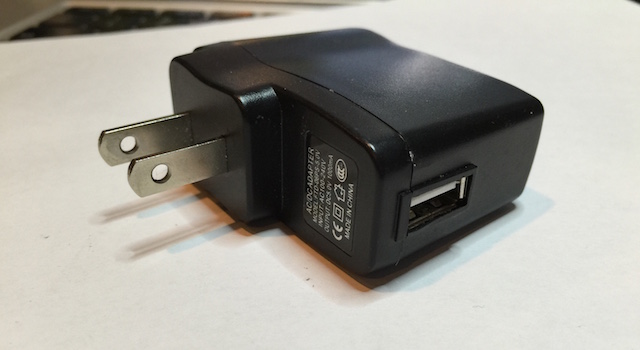
KeySweeper is a stealthy Arduino-based device, camouflaged as a functioning USB wall charger, that wirelessly and passively sniffs, decrypts, logs and reports back (over GSM) all keystrokes from any Microsoft wireless keyboard in the vicinity.
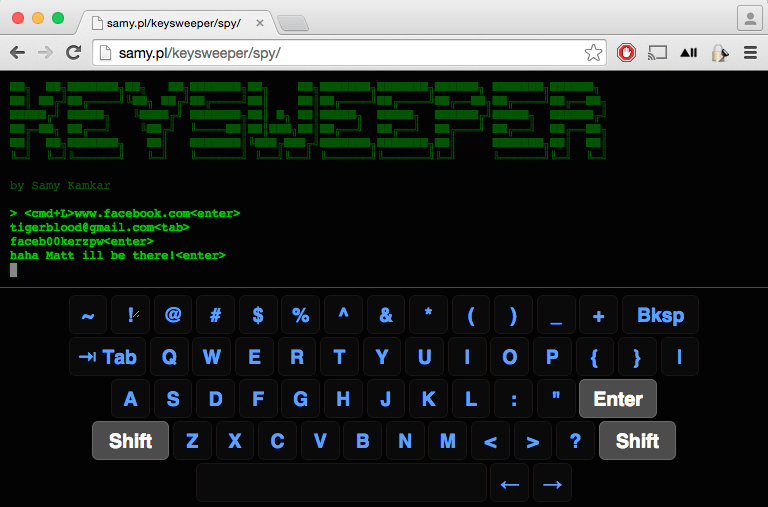
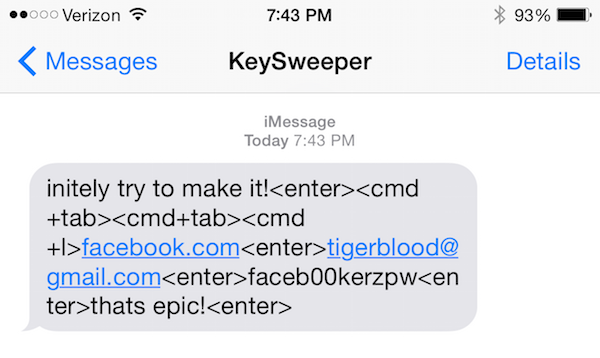
All keystrokes are logged online and locally. SMS alerts are sent upon trigger words, usernames or URLs, exposing passwords. If unplugged, KeySweeper continues to operate using its internal battery and auto-recharges upon repowering. A web based tool allows live keystroke monitoring.
By @SamyKamkar
Live demonstration and full details available in the video:
Point of Contact: @SamyKamkar // code@samy.pl // https://samy.pl
Released: January 12, 2015
Source code / schematic: https://github.com/samyk/keysweeper
Unit Cost: $10 - 80 depending on operation (not for sale)
Status: Operational, open source, open hardware, declassified.
(U) Capabilities

KeySweeper is a stealthy Arduino-based device, camouflaged as a functioning USB wall charger, that wirelessly and passively sniffs, decrypts, logs and reports back all keystrokes from any Microsoft wireless keyboards (which use a proprietary 2.4GHz RF protocol) in the area.
Keystrokes are sent back to the KeySweeper operator over the Internet via an optional GSM chip, or can be stored on a flash chip and delivered wirelessly when a secondary KeySweeper device comes within wireless range of the target KeySweeper. A web based tool allows live keystroke monitoring.
KeySweeper has the capability to send SMS alerts upon certain keystrokes being typed, e.g. "www.bank.com". If KeySweeper is removed from AC power, it appears to shut off, however it continues to operate covertly using an internal battery that is automatically recharged upon reconnecting to AC power.
KeySweeper extends the work of Travis Goodspeed on the goodfet.nrf project and of Thorsten Schröder and Max Moser of the KeyKeriki v2.0 project.
(U) Hardware
Arduino / Teensy microcontroller
$3 - 30: An Arduino or Teensy microcontroller can be used. In my build, I use an 3.3v Arduino Pro Mini due to its very thin profile.
nRF24L01+ 2.4GHz RF Chip
$1: I use a $1 nRF24L01+ RF chip which communicates using GFSK over 2.4GHz. More details are available below, and these chips can be purchased for as low as $1 on eBay. These chips can only communicate using proprietary protocols, and are not meant for sniffing, however we will see below they can be used in clever ways to promiscuously sniff.
AC USB Charger
$6: I use an inexpensive AC USB charger (rectifier) which converts AC power to 5v DC, and this one I link to happens to have a screw which makes it easy to open (I've destroyed a few others in the process of opening). If using the GSM version of KeySweeper, I actually use two USB chargers -- the internals of a small charger (similar to that of an iPhone charger), and the external case from a larger USB charger.
SPI Serial Flash Chip
OPTIONAL ($2): An optional SPI Serial Flash chip can be used to store keystrokes on. If you use the FONA GSM board below, this is not necessary as keystrokes can be stored through the internet live, however if you wish to have a lower cost option, you can store keystrokes onto this chip within KeySweeper, and obtain the keystrokes later by getting within 2.4GHz wireless range of the device with a secondary device which will siphon the keystrokes from it.
Most microcontrollers have very limited memory or EEPROM to store data on, thus the advantage of having a flash chip to store these keystrokes on.
Adafruit FONA
OPTIONAL ($45): Adafruit has created a board called the FONA which allows you to use a 2G SIM card to send/receive SMS's, phone calls, and use the Internet directly from the device.
Using this, no flash chip is necessary as keystrokes are immediately sent to a backend server for proper data collection. Additionally, if specific keywords are ever typed by the target keyboards, an SMS message can be sent to a specified number to alert the operative of the fact.
SIM Card
OPTIONAL ($3, only if using FONA): The FONA requires a mini-SIM card (not a micro-SIM). I use a T-Mobile prepaid SIM card. I suggest use of T-Mobile as they support 2G, where most other carriers have or are deprecating their 2G network, and the FONA only supports 2G for Internet. Make sure you get the right size of SIM card -- more details on FONA SIM requirements here.
3.7V Lithium-Ion (LiOn or LiPo) Battery
OPTIONAL ($5 and up, only if using FONA): The FONA provides on-board LiPo/LiOn battery recharging, and while KeySweeper is connected to AC power, the battery will be kept charged, but is required nonetheless. Additionally, KeySweeper continues to operate covertly from battery power when pulled from AC power, and begins to recharge upon reconnecting to AC power.
(U) Software
KeySweeper
KeySweeper's source code and schematic can be obtained in entirety from my github: https://github.com/samyk/keysweeper
There are multiple parts to KeySweeper. The primary code is installed on the microcontroller, while a web based backend using jQuery and PHP logs all keystrokes and provides a web interface for live monitoring of the target keyboards.
Adafruit FONA library
You should use my version of the Adafruit FONA library as I include an additional option that allows the FONA to let us know when there's a new text message. In the original library, you must constantly poll to see if there are more text messages than you expect, however with my version you can enable an option fona.setSMSInterrupt(1) which causes the RI (Ring Interrupt) pin to pull low for a moment upon new SMS messages.
jQuery Terminal
I've created a backend tool that allows you to monitor keyboards live through a web page. The jQuery Terminal plugin makes it look cooler.
jQuery UI Virtual Keyboard
jQuery UI Virtual Keyboard continues to make the KeySweeper live spy interface tool look cool, showing keys on the virtual keyboard get pressed when the user actually presses keys.
(U) Determining Keyboard Radio Protocol
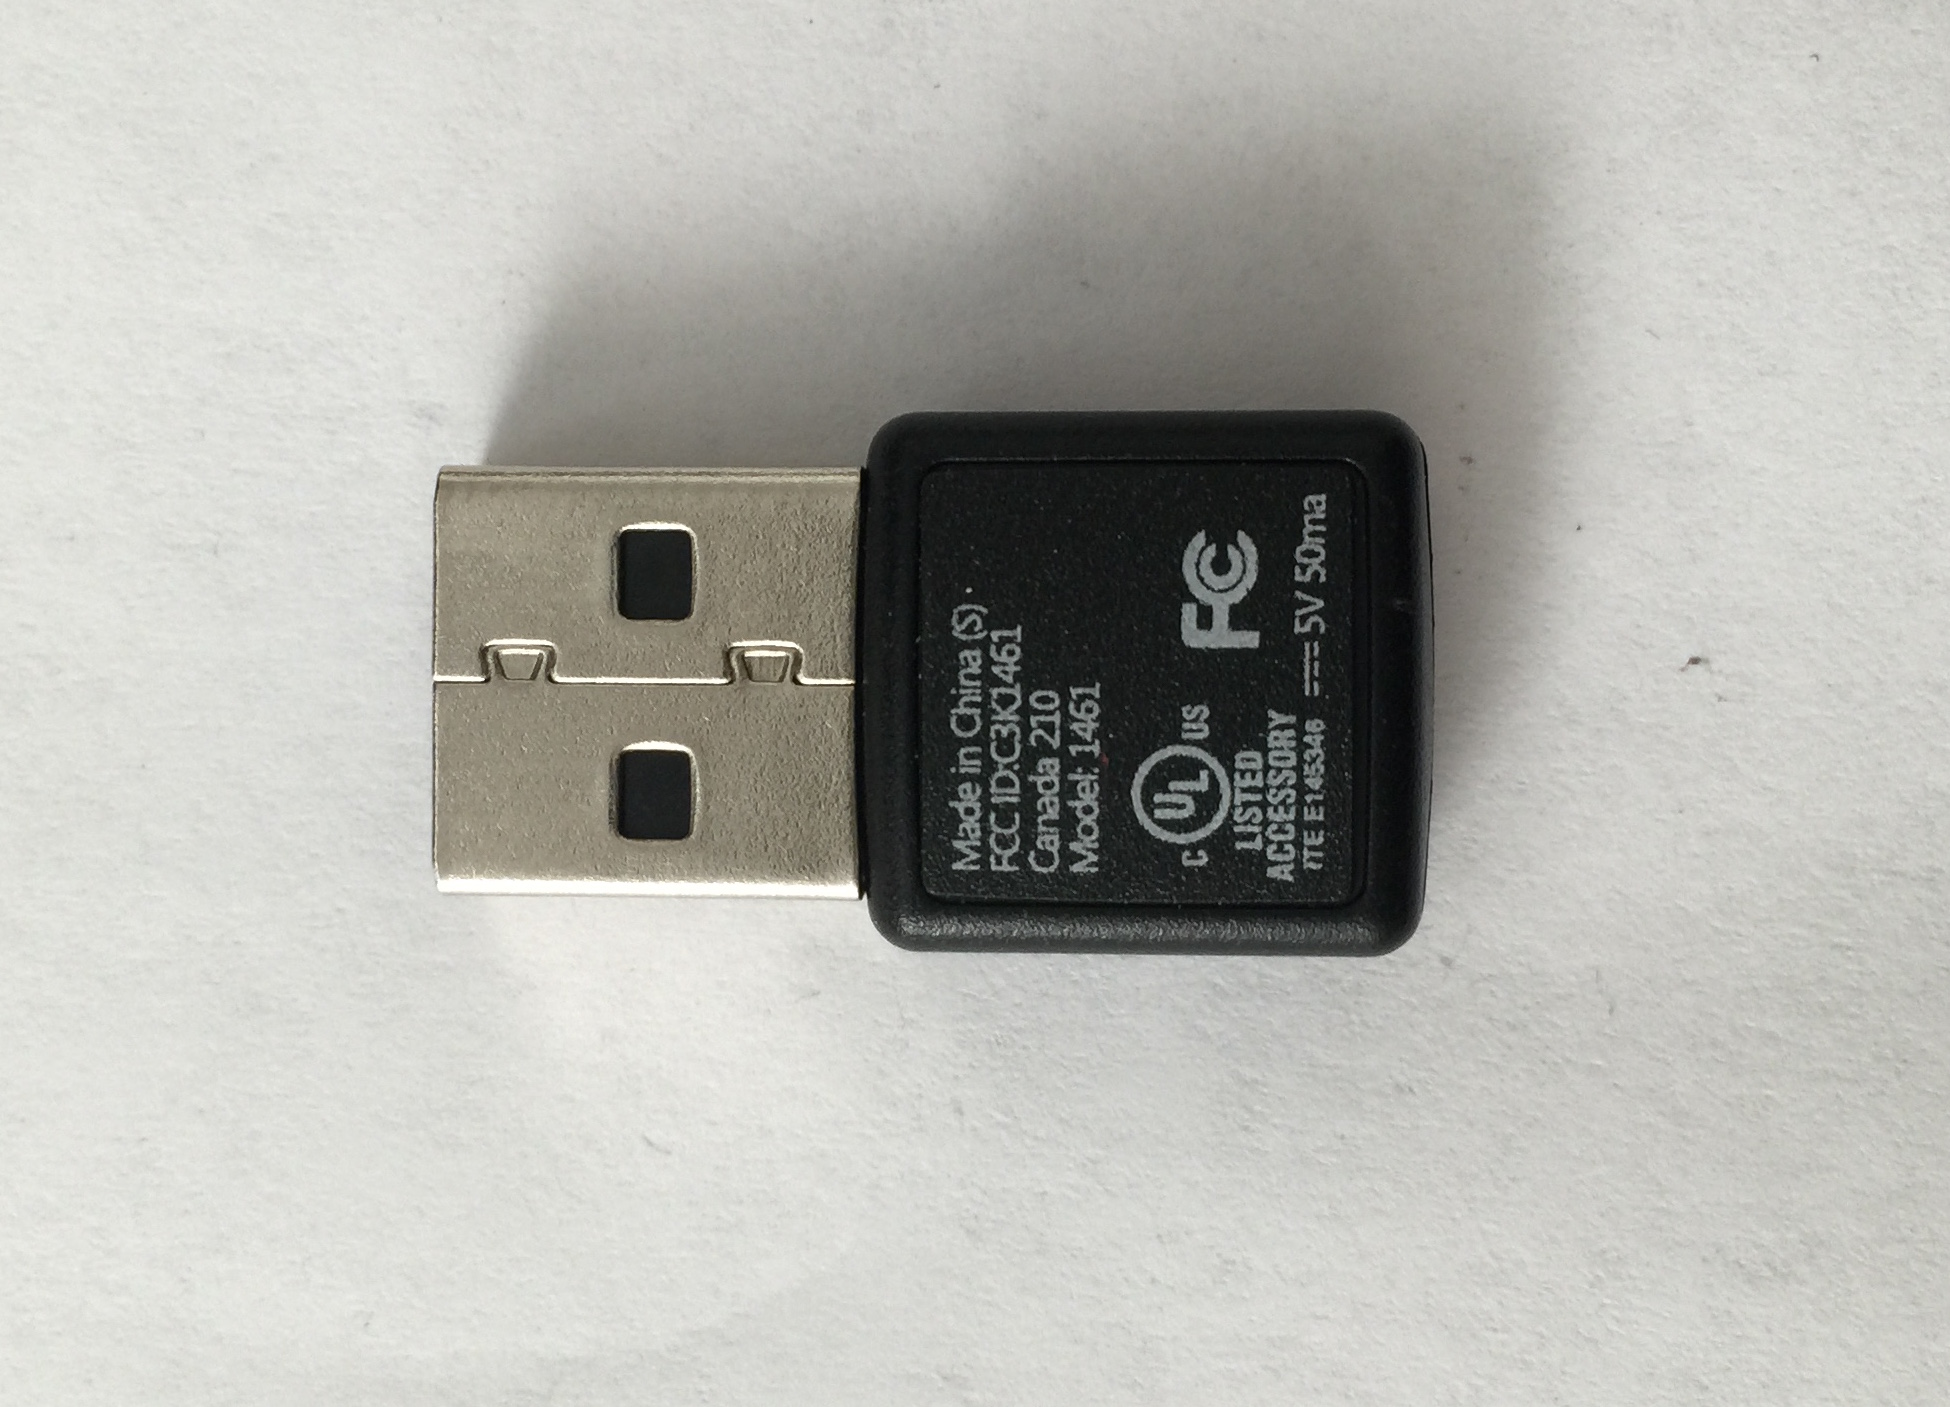
Upon obtaining a Microsoft wireless keyboard, if it's in our possession, we can refer to the back to inspect the FCC ID. On my keyboard, the FCC ID (which is required by all devices using radio frequencies in the US) is C3K1455, which we can easily search on the FCC's website.
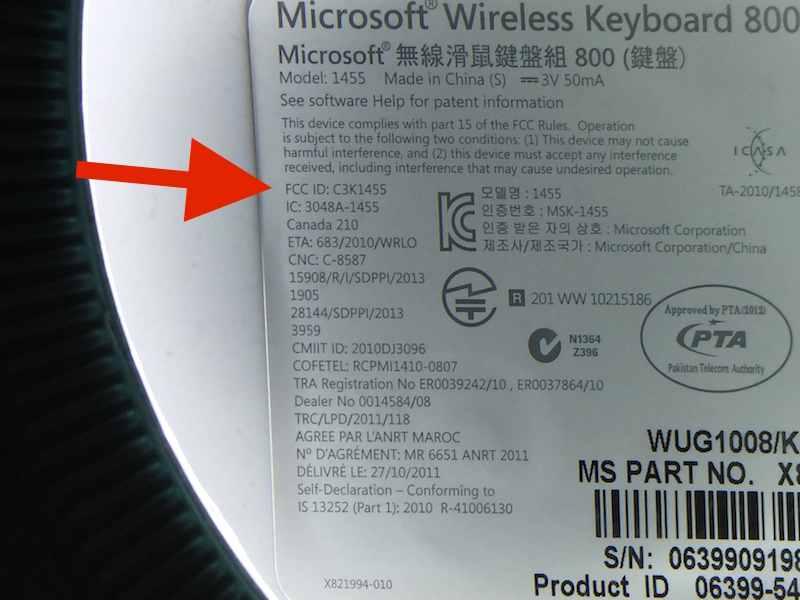
Immediately we discover the keyboard communicates on 2403 - 2480MHz based on the FCC report.
Now that I know this is a 2.4GHz device, I assume it's either operating using a common 2.4GHz protocol such as wi-fi, bluetooth, zigbee, or others, or it's operating using a proprietary protocol. Due to the fact that the device came with its own USB dongle (with its own FCC ID, C3K1461), it's more than likely a proprietary 2.4GHz signal.
Because it's likely proprietary 2.4GHz, we need to now use some method of 2.4GHz sniffing. Wifi sniffers will not help as this isn't 802.11 (such as what we used in SkyJack), and RTL-SDR by itself won't help as it caps out around 2.2GHz unless additionally using an RF down converter (we used RTL-SDR in Digital Ding Dong Ditch), so I immediately want to use HackRF, a powerful and inexpensive software defined radio, however while it's extremely powerful for its price, we may be able to get away with more inexpensive hardware.
Based off previous experience, my assumption is the keyboard is using something like a Nordic nRF24L01+, a TI CC2500, or Cypress CYRF6936, but we won't know for sure without further inspection.
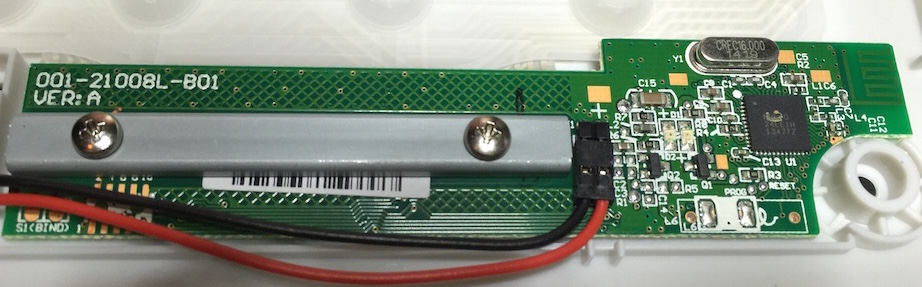
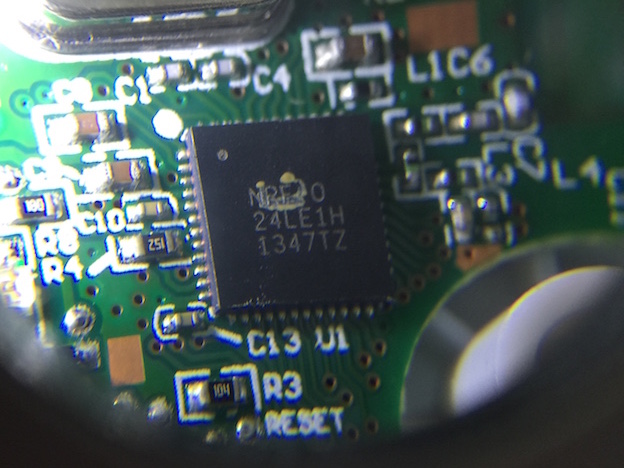
After pulling the screws from the keyboard and opening it up, we see a single chip responsible for everything. It's labeled NRF 24LE1H, which sounds a lot like nRF24L01 (n=Nordic Semiconductor, RF=Radio Frequency, 24=2.4GHz)! We quickly find the nRF24LE1 chip with a search and see that it in fact has the nRF24L01+ RF chip integrated with a CPU (System-on-Chip/SoC), and a quick search on eBay shows the nRF24L01+ can be shipped to us for under $1.
The nRF24LE1 integrates an nRF24L01+ 2.4GHz RF transceiver core, enhanced 16MHz 8-bit 8051 compatible CPU, 1kB + 256B RAM, 16kB embedded Flash, and a wide range of system peripherals
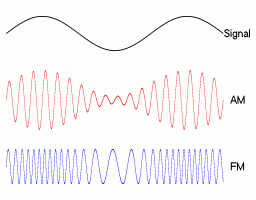
Looking at the nRF24L01+ datasheet, we see this is a 2.4GHz RF chip that operates at either 250kbps/1Mbps/2Mbps, uses GFSK (Gaussian frequency-shift keying modulation is a digital frequency modulation/FM), and unfortunately lacks any legitimate promiscuous or direct mode for sniffing...or does it?
(U) Sniffing Proprietary 2.4GHz Signals
While I would normally pull out something like a HackRF or RTL-SDR with digital down converter (to get 2.4GHz into RTL-SDR range), it would be really nice if we could sniff with more inexpensive hardware, as ultimately I want to package everything up into a device that can be left in the field.
After a basic search, an amazing page came up from Travis Goodspeed, where he not only sniffs a similar keyboard (Microsoft Comfort Desktop 5000), but he also demonstrates how to turn the nRF24L01+ into a 2.4GHz sniffer using his GoodFET device, and a host computer with the goodfet.nrf python application.

Travis found that sniffing with the device is traditionally difficult because not only must you specify the channel (frequency) to listen to, you must specify a MAC address to listen on. The nRF chip will only deliver packets sent to that specific MAC address. Additionally, the nRF chip won't tell you the MAC address since you already specified it (it's assumed to be in one of our RX_ADDR_P[0-5] pipes, found in the datasheet.)
However when specifying the length of the MAC, Travis found there is one option which is considered "illegal" in the datasheet (SETUP_AW, 0x03 set to 00), but actually sets the MAC to 2 bytes! Also, by setting the MAC to data that would typically be found in the preamble (0x00AA or 0x0055, in binary 0000000010101010 or 0000000001010101), we can fool the device into giving us the packet early, providing a full MAC address to us in the data portion! Read his great write-up for all the details.
(U) Increasing Speed and Portability
Now while we can use a GoodFET, computer and nRF24L01+ for sniffing during testing, we ultimately want this to be on an inexpensive and embedded device. We can take some of Travis' great work in Python and port it over to embedded C so that we can load it onto a microcontroller rather than requiring a computer+GoodFET.
Additionally, we implement a few improvements. Goodfet.nrf provides a method of scanning for devices by performing the following:
- start at frequency 2400MHz
- set datarate to 1Mbps and MAC to 0x00AA, listen for 10 seconds
- set datarate to 2Mbps and MAC to 0x00AA, listen for 10 seconds
- set datarate to 1Mbps and MAC to 0x0055, listen for 10 seconds
- set datarate to 2Mbps and MAC to 0x0055, listen for 10 seconds
- increment frequency and start over, and once we hit 2528MHz, reset to 2400 (128 frequencies)
- upon seeing a potential keyboard, we require at least four packets to meet a threshold to be sure it's a legitimate packet as get many false positives
This means to scan the full range of frequencies, it takes ~85 minutes and at least several keystrokes must be pressed while we're sniffing within the correct 10 second period. After going over Travis' research and keyboard, the KeyKeriki research and keyboard, and my own keyboard, we can implement a few improvements:
- if you recall from the FCC, we're only using 2403 - 2480MHz for these keyboards, reducing our 128 possible frequencies down to 78 (about 40% reduction in scanning)
- all keyboards use 2Mbps, cutting our search in half
- after inspecting more keyboards, I found that all Microsoft keyboards begin with 0xCD as the MAC, which tells us that our preamble will always be
0xAA (10101010)because the preamble of 0xAA is always followed by a 1 bit (0xCD is 11001101) in order to keep the bits alternating, cutting our search in half - because we know the first byte of our MAC (0xCD), and we also know certain packets to look for, we simply detect only those packets which means we only ever need to see a single packet to be confident that it is in fact a keyboard
- we reduce the scan per frequency to 500ms, causing our scan to take under 40 seconds to complete one full sweep
(U) Decrypting Keystrokes
Thorsten Schröder and Max Moser presented a great device, the KeyKeriki, capable of sniffing Microsoft keyboards and have fully reverse engineered the decryption process and produced a device for doing so. However Travis points out that their device requires two radios and a high-end microcontroller to capture and parse packets at the 2Mbps speed the keyboards communicate at. Travis' project is great as well, however requires a host computer and will be too large for our covert implementation. We improve upon these designs in this scenario by requiring only an inexpensive radio and microcontroller, both low power and very small, no computer or fancy radios required.
Thorsten and Max discovered the keystrokes are simply encrypted (xor'd) with the MAC address in ECB mode, which we are able to sniff after using Travis' method of abusing the nRF24L01+ to both sniff and reveal MAC addresses. This "encryption" is the equivalent of taking a new deck of cards, cutting it once, and calling it shuffled.
After further investigation, I found that since we now know all Microsoft keyboards begin with 0xCD as the MAC address, the actual keystroke (in orange below) happens to be aligned with the first byte of the MAC address (0xCD). This means even if we do not know the MAC address, we can decrypt the keystroke, as the alignment will never change, and 0xCD is always the first byte of the MAC.
An additional discovery is that since the length of the encryption portion of the packet is 11 bytes, the MAC is 5 bytes, and the CRC is each byte xor'd with another (before encryption), something interesting happens. Since the MAC is xor'd twice, we can also calculate the checksum without knowing the MAC address. This is because the MAC address is in there in full twice, and xoring any number by itself (or xor the MAC with the MAC) cancels itself out. The 11th byte is the first byte of the MAC again, which we always know is 0xCD. This allows us to perform other attacks, such as altering the keystroke and CRC, again without knowing the MAC address. I will present this and some other fun demonstrations in a future project.
A page from the KeyKeriki presentation demonstrates the decryption process:
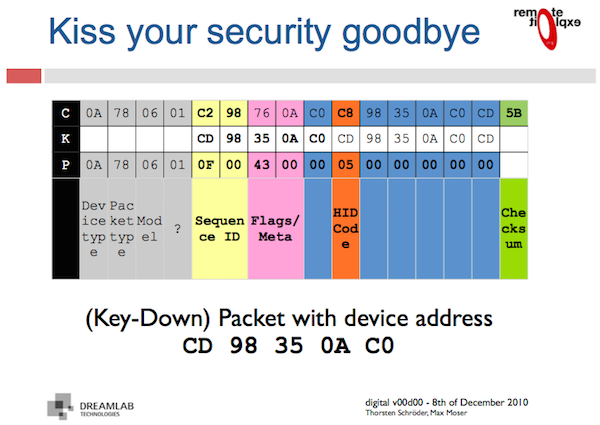
- Device type 0x0A = keyboard, 0x08 = mouse
- Packet type 0x78 = keystroke, 0x38 = idle (key is held down)
- Model type 0x06 = keyboard? This is the same HID code for a keyboard
- HID code 0x05 = letter 'b' (described in section 7 here)
Our decryption method, implemented in the KeySweeper source code:
// decrypt those keyboard packets!
void decrypt(uint8_t* pkt)
{
  // our encryption key is the 5-byte MAC address and
  // starts 4 bytes in (4-byte header is unencrypted)
  for (int i = 4; i < 15; i++)
    pkt[i] ^= mac >> (((i - 4) % 5) * 8) & 0xFF;
}
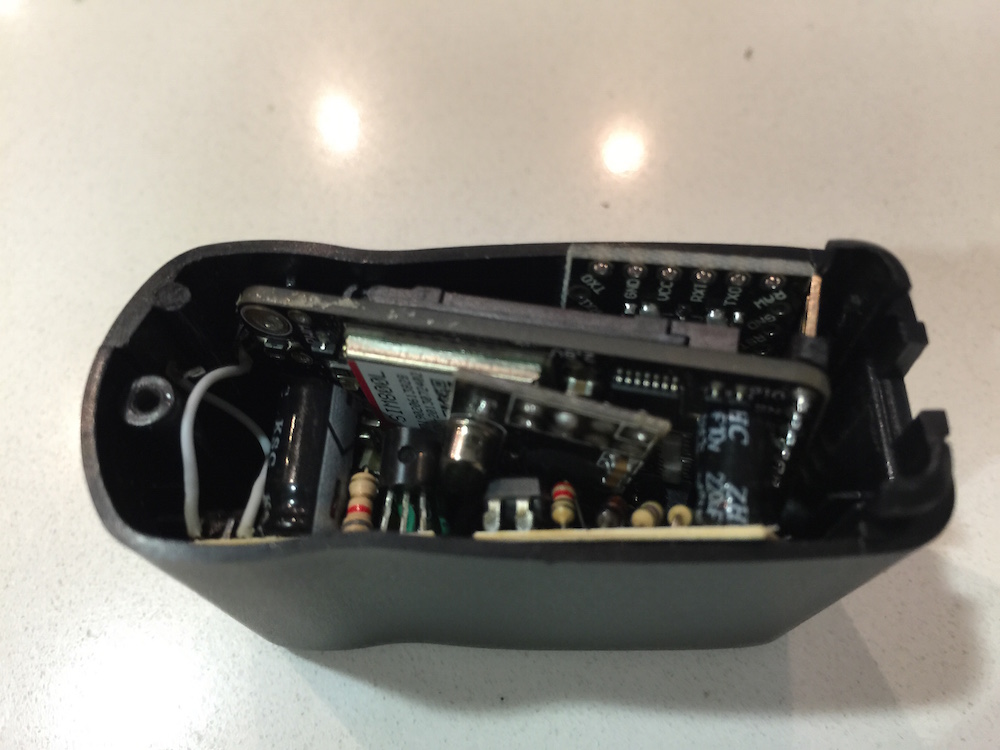
(U) Building / Usurping a USB Charger
WARNING: Devices which connect to AC mains are using high-voltage power, and the device we are creating which connects to AC is not safe, nor does it meet typical electrical safety standards. This is a dangerous device and if used or built improperly, can kill, cause fire, or other severe damage. Do not build an AC-powered device unless you know what you're doing. If you wish to continue building this device but without AC power, simply use a battery or power the device from USB directly to safely follow along.
KeySweeper uses extremely low-power and low profile hardware to remain as covert as possible. KeySweeper can be operated from a battery, or from ~3-20V DC power. Because we wish to keep KeySweeper powered at all times, we stealthily install it inside of an innocent wall USB charger which we expect to be always plugged in.
In the case that the USB charger is unplugged, KeySweeper stealthily continues its operation using its (optional) internal battery. The moment KeySweeper is plugged back in, it switches back over to using AC power, and simultaneously recharges the battery.
If you are simply building KeySweeper without the GSM board, you can fit everything in a typical AC USB wall charger. I suggest looking for one that has a screw holding it together, as most others are sealed shut and requires destruction of some part of the device in order to open it.
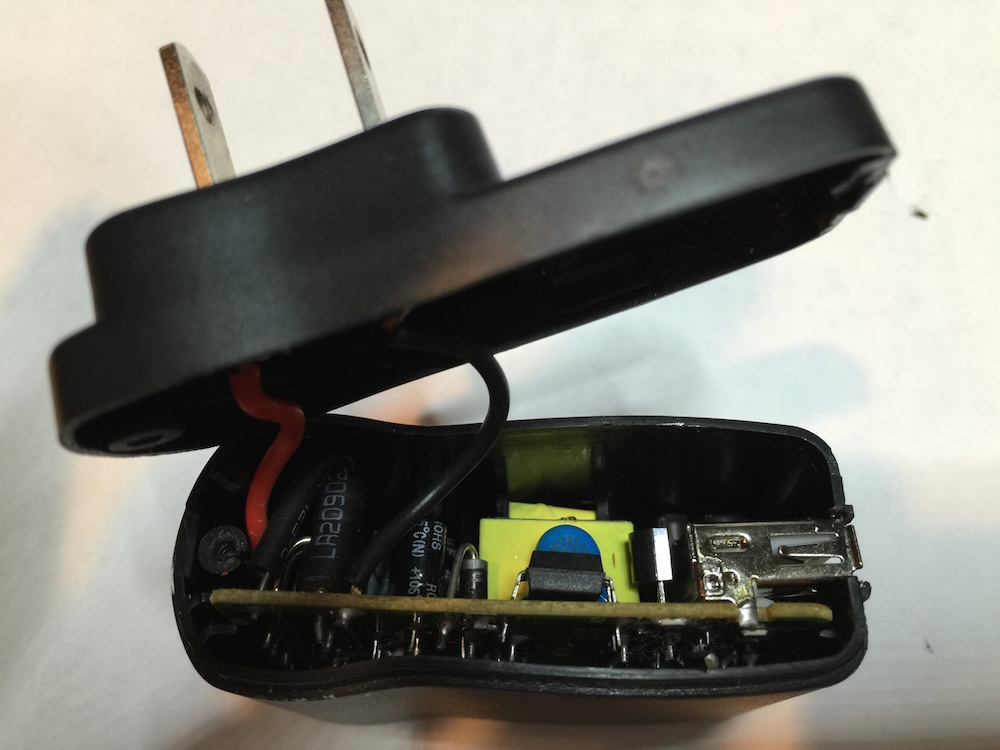
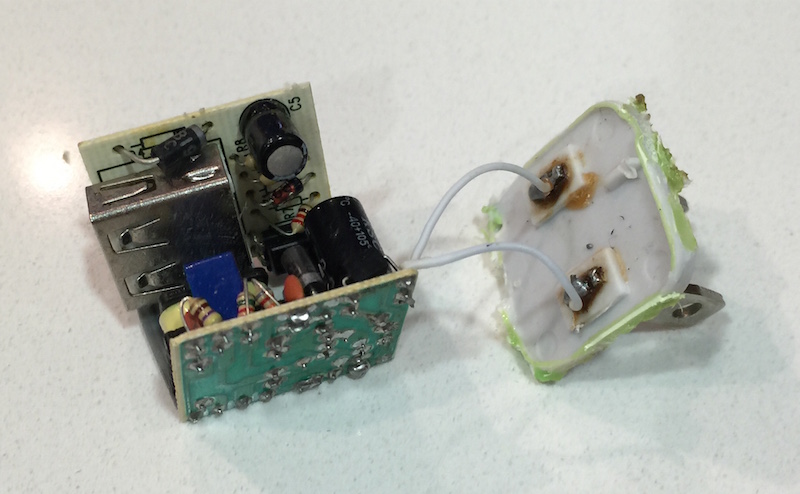
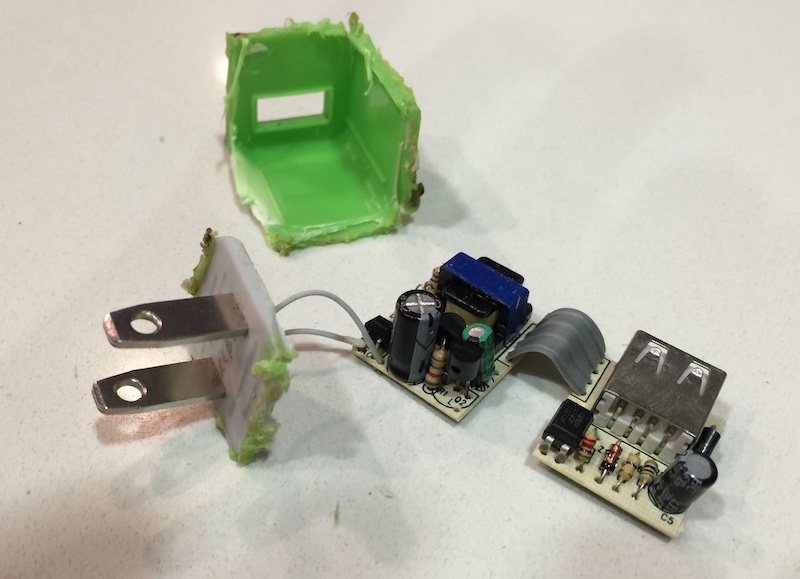
If you decide to use the GSM board, I found it would not fit in this type of USB charger along with the rest of the electronics. However, I discovered that by opening a smaller USB charger (similar to the iPhone USB chargers), we find a much smaller rectifier (AC->DC) and step-down convertor (high voltage->5V) that allows all of our electronics to fit into the larger USB charger.

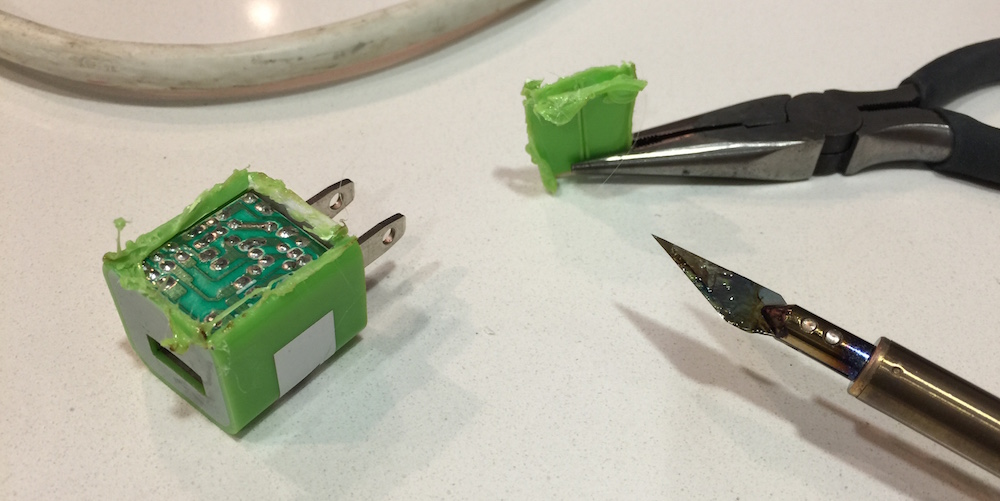
My friend Dana lent me her doll soldering iron. I don't quite understand what she uses it for, but it's a soldering iron with an attachable razor. This is great for cutting through plastic, and dolls, I presume. She took the iron back as soon as I explained what the device would do. Apparently she does not support this, though I'm not sure why. I'm sure I'll find out after I sniff more keystrokes from her keyboard.
WARNING: Again, because we are dealing with AC power, this is very dangerous. Do not open/rewire an AC powered device unless you know what you're doing. You can still build KeySweeper by simply powering everything from a USB charger, port or battery without modifying an AC-based device.
It's also important to wire up our Arduino via the RAW port to the 5v USB power with correct polarity (negative to GND, positive to RAW). In this case, I'm using a 3.3v Arduino Pro Mini. The RAW port takes in unregulated voltage between 3.35-12v and uses an onboard voltage regulator to bring it down to 3.3v. Note that our nRF24L01+ chip requires 1.9-3.6v, so giving it 5v is too much! Additionally, if you're using an SPI chip such as the SST25VF016B, it requires 2.7-3.6v, so again using 5v is too much! Be sure to use the regulated 3.3v off of the Arduino (from the VCC pin on a 3.3v Arduino, or the 3V3 pin on a 5v Arduino.)
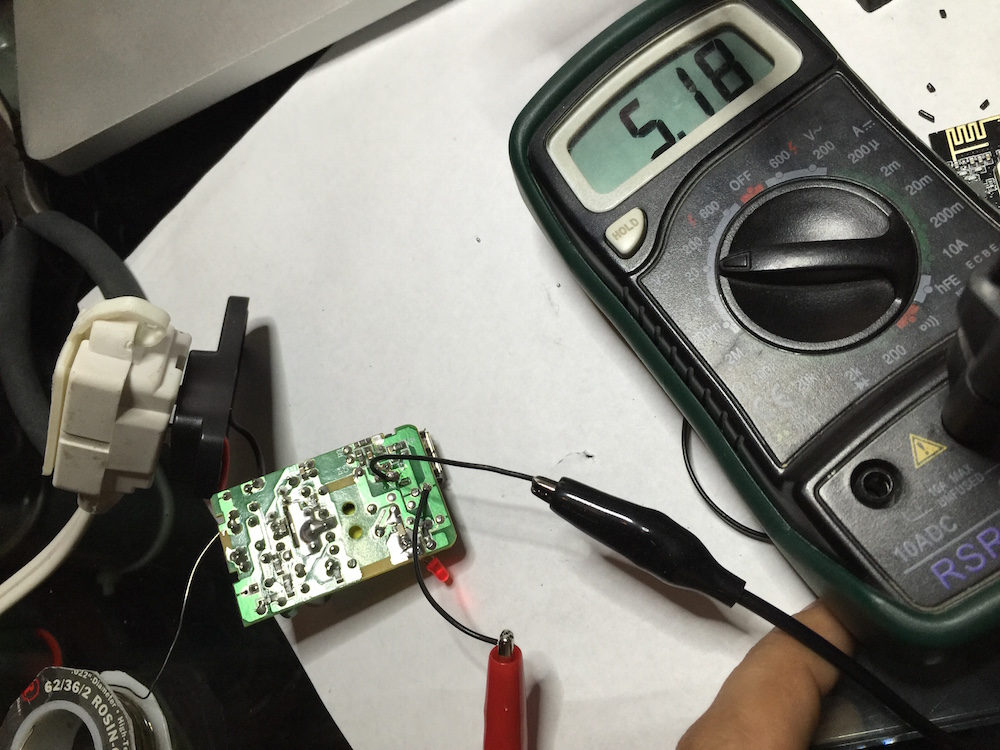
note: the USB board pictured next to the multimeter is the original, larger USB charger before I had decided to swap it out with a smaller one to fit in the GSM board as well
After grabbing all of our hardware, we can see it all fits with space in our charger (before wiring):
For fun, I tied the charger's LED to pin 6 on the Arduino and while the LED appears to behave the same, I actually have it flash upon sniffing keystrokes. This will likely blow your cover, but is really fun to watch. I also ensure the LED turns off when power to AC is lost, even if the rest of the device continues to operate from the internal battery.
We also want to make sure we leave the rest of the USB charger operational so that other devices can continue to get power from the USB charger.
(U) Optional Secondary KeySweeper
If you wish to forgo the GSM board to keep costs down, you can create a secondary KeySweeper device simply containing an Arduino and nRF24L01+. While compiling the secondary one, uncomment the #define BACKTRACER 1.
The way this works is if the secondary KeySweeper (BACKTRACER) ever comes within wireless distance (using the 2.4GHz nRF24L01+) of the first one, it auto-detects the existence of the first one and the initial KeySweeper device will dump its logs to the BACKTRACER. Autodetection is built into both KeySweepers so they can quickly find each other, thanks to the ability of the nRF24L01+ to have multiple RX pipes.
If you have the BACKTRACER hooked up to a computer, the keylogs will be dumped to serial, and you can send an 'E' command over serial to erase the contents of the original KeySweeper's SPI Flash chip now that you've obtained its contents. You can walk away allowing the original KeySweeper to continue logging keystrokes.
(U) Schematic
Click for larger version (FONA-based schematic), or click here for the Fritzing file.

(U) Contact
Point of Contact: @SamyKamkar
You can see more of my projects at https://samy.pl or contact me at code@samy.pl.